How to Integrate with Zapier: Streamline your bookings with automation
Zapier is a powerful automation tool that connects your favorite apps, allowing them to work together seamlessly. It enables you to create "Zaps," which are automated workflows that perform actions in one app based on triggers from another. With Zapier, you don't need to know how to code to automate repetitive tasks—it's designed to be user-friendly and can make your daily operations more efficient.
Why Use the Nabooki-Zapier Integration?
By integrating Nabooki with Zapier, you can automate and streamline your booking-related processes. This integration allows you to connect Nabooki to over 3,000 other apps, making it easier to manage your bookings, customers and services without needing manual intervention.
Example Use Cases for the Nabooki-Zapier Integration
Email Marketing Campaigns
Connect Nabooki to email marketing platforms like Mailchimp or Constant Contact to automatically add new customers to a mailing list when they make a booking. This makes it easy to follow up with promotions, reminders or newsletters.CRM Integration with Custom Platforms
Although Nabooki includes CRM (Customer Relationship Management) capabilities, you might also use third-party CRMs like Zoho CRM, Salesforce, or HubSpot. This Zapier integration ensures booking and customer details are automatically pushed into your chosen CRM, maintaining updated and complete customer records.Accounting & Invoicing Integrations
In addition to native support for QuickBooks, you can use Zapier to connect with other popular accounting tools like Xero or MYOB. This helps automate the invoicing process when a booking is created or updated, ensuring all financial records are up to date.Social Media Updates
Use the Zapier integration to automate social media posts or updates when bookings occur. This is a great way to keep your followers engaged and notify them about upcoming events or promotions.
Step-by-Step Guide: Connecting Nabooki to Zapier
How it Works
Nabooki provides three triggers in Zapier:
- Booking Created: Triggered when a new booking is made in Nabooki.
- Booking Cancelled: Triggered when a booking is canceled in Nabooki.
- Booking Updated: Triggered when an existing booking is modified.
Note: When a booking is updated, it may trigger both a "Booking Cancelled" (for the original booking) and a "Booking Created" (for the new details), depending on the changes made.
Generate API Token within Nabooki
To access the Zapier integration, log in to your Nabooki account and follow these steps:
- In the left-hand menu, click on Add-ons.
- Select Zapier.
Purpose: API tokens establish secure connections between Nabooki and Zapier.
Note: API tokens specifically for Zapier are generated for each user account.
Management: Each token displays its creation and last-used date for tracking.
Revoking Access: Click the ellipsis (...) > Delete to revoke a token. Revoking stops all further data exchanges.
- Click on the “Create API token” button. Copy the key to your clipboard.


Get started with Zapier
Once you have generated and copied the API token from the integration page, follow these steps to create a new Zap in Zapier:
Log in to your Zapier account.
If you do not have a Zapier account, simply sign up.
Create a new Zap.
In the App field, search for Nabooki and select it.
Then under the Trigger event, select your preferred event trigger. (Booking Created, Booking Updated, Booking Cancelled).
In the Account section, allow Zapier to connect to your Nabooki account by pasting the API token you generated from the Zapier Integration page in Nabooki.
After entering the token, click “Yes, continue to Nabooki” to confirm access.
Your Nabooki account will then be pre-selected in the Account field.
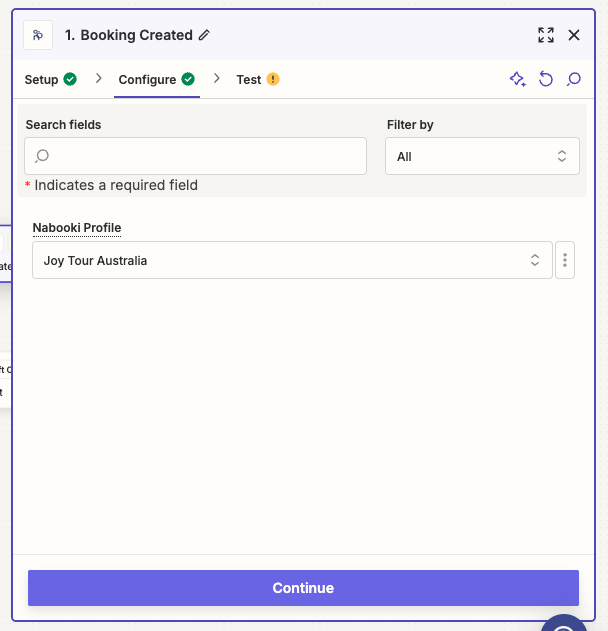
Click “Continue”, then select the business account under “Nabooki Profile”.
Click “Continue”, then click “Test trigger”
Click “Continue with selected record”
Note: You can integrate multiple Nabooki business accounts with Zapier. However, you must select which Nabooki account to connect with each Zap. Multi-account selection is not supported due to Zapier’s limitations. If you want to use the same Zaps for multiple accounts, you'll need to duplicate your Zaps and select the relevant account for each one.
Managing custom fields
If the business requires custom fields on the booking, which need to be integrated into the Zaps (automated workflows in Zapier), we must first map out these custom fields. This involves identifying the specific fields that need to be included, defining how they will be structured, and ensuring they are correctly matched to the corresponding fields in the Zap to ensure seamless data flow between systems.
Note: When mapping out custom fields, we need to ensure that the booking selected in testing the event trigger should have custom fields added to the booking. If not, mapping of custom fields won’t work.Follow these steps to map out custom fields:
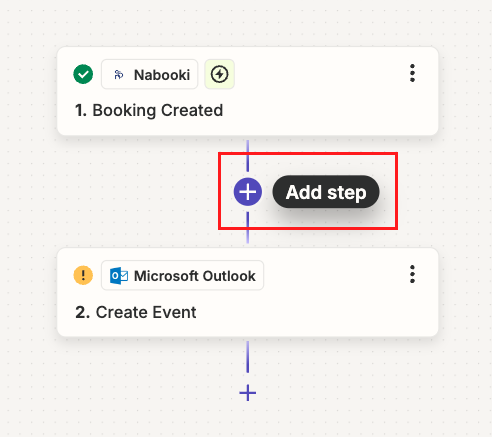
On your Zap automated workflow, click “+” in between the trigger event and action Note: Adding multi-step Zaps only works for Professional Zapier Subsciption Plan (or above) and not for Free Accounts.
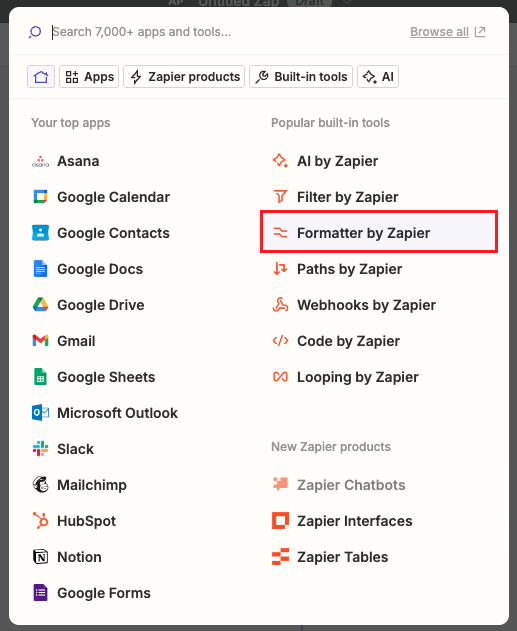
Search or click “Formatter by Zapier”
On “Action event” field, select “Utilities”. Then click “Continue”
Then under “Transform”, select “Line-item to Text”
Then click “Continue” and test the zap. Note: This would be what the “data out” looks like.
Managing event subscriptions
Once Zapier integration is active and a Zap is created, a table will display all event subscriptions associated with the user’s account.
Details Shown:
Event Type: (e.g., "Booking Created", “Booking Cancelled”, “Booking Updated”)
User: The user associated with the Zap.
Last fired: Timestamp and status (e.g., "success" or ‘failed”)
Need Help?
If you need assistance, contact our support team:
💬 Live Chat: Click the chat icon in the bottom-right corner of the screen.
📧 Email: support@nabooki.com
Related Articles
Cancel bookings in bulk
Cancel bookings in bulk You can cancel multiple bookings at once from the Bookings page, without having to open and cancel each one individually. ? Note: You can also cancel bookings from the Customers page, but searching the customers name and ...How to Integrate Braintree as Your Payment Gateway
Integrating Braintree with Nabooki enables you to securely accept online payments from your customers during the booking process. Follow the steps below to connect Braintree to your Nabooki account and activate online payments for your services. Step ...Enabling staff selection for bookings
Enabling staff selection for bookings By default, Nabooki automatically assigns an available staff member when a customer books. If you want customers to choose who provides their service, you can turn this on in the service settings. Before You ...How to Integrate Kovena as Your Payment Gateway
Integrating Kovena with Nabooki allows you to securely accept online payments from your customers during the booking process. Kovena allows you to create and link your account directly from within Nabooki. There's no need to register separately. ...Reinstating bookings
Reinstating bookings When a booking is cancelled or changed, Nabooki keeps a placeholder in the original time slot — shown as a transparent booking with a red cross. You can use this placeholder to reinstate the booking or remove it from your ...